Cropper
Easily custom-crop a lot of photos!
 Cropper
- Quickly prepare a group of images for printing
- Quickly pre-process images for use in Picture Medleys
- Quickly label your image files
- Lossless rotation of jpeg images
- Make your scrapbook pages more interesting
Works well with:
Features
This little application lets you easily crop photos for use as tiles in PictureMedley or for printing.
Quickly prepare a group of images for printing
Whether you have a 4x6 or 5x7 photo printer or you upload images to a photo printer (either web site or local printing service), take control of the parts of the image that get trimmed away by cropping the image yourself before printing.
Quickly process images for use in Picture Medleys
The PictureMedley application imports a large number of images and automatically trims away parts of the images in order to fit them into the mosaic. In generating medleys containing people’s faces, I like to have the faces fill as much of each tile as possible. Since the subject isn’t necessarily in the center of the frame the resulting mosaic tiles have imagery that is too small. With Cropper I can “process” a large number of photos in a short amount of time, extracting exactly the parts of each photo that I want to appear in the final mosaic.
Quickly label your images
Use “tags” that you can easily customize to assign simple keywords to the filenames of your picture files (both originals and crops). Tihs is a fast since the photo file never has to be read into memory.
Rotation of jpeg images
Now while you’re reviewing the photos fresh from your camera you can rotate the pictures as you go. Image rotation is done using a “lossless” approach where possible, which means that the picture does not need to be re-compressed (which would result in a loss of picture quality).
Fine rotation
Use the “tilt” buttons to nudge the image angle one degree at a time.
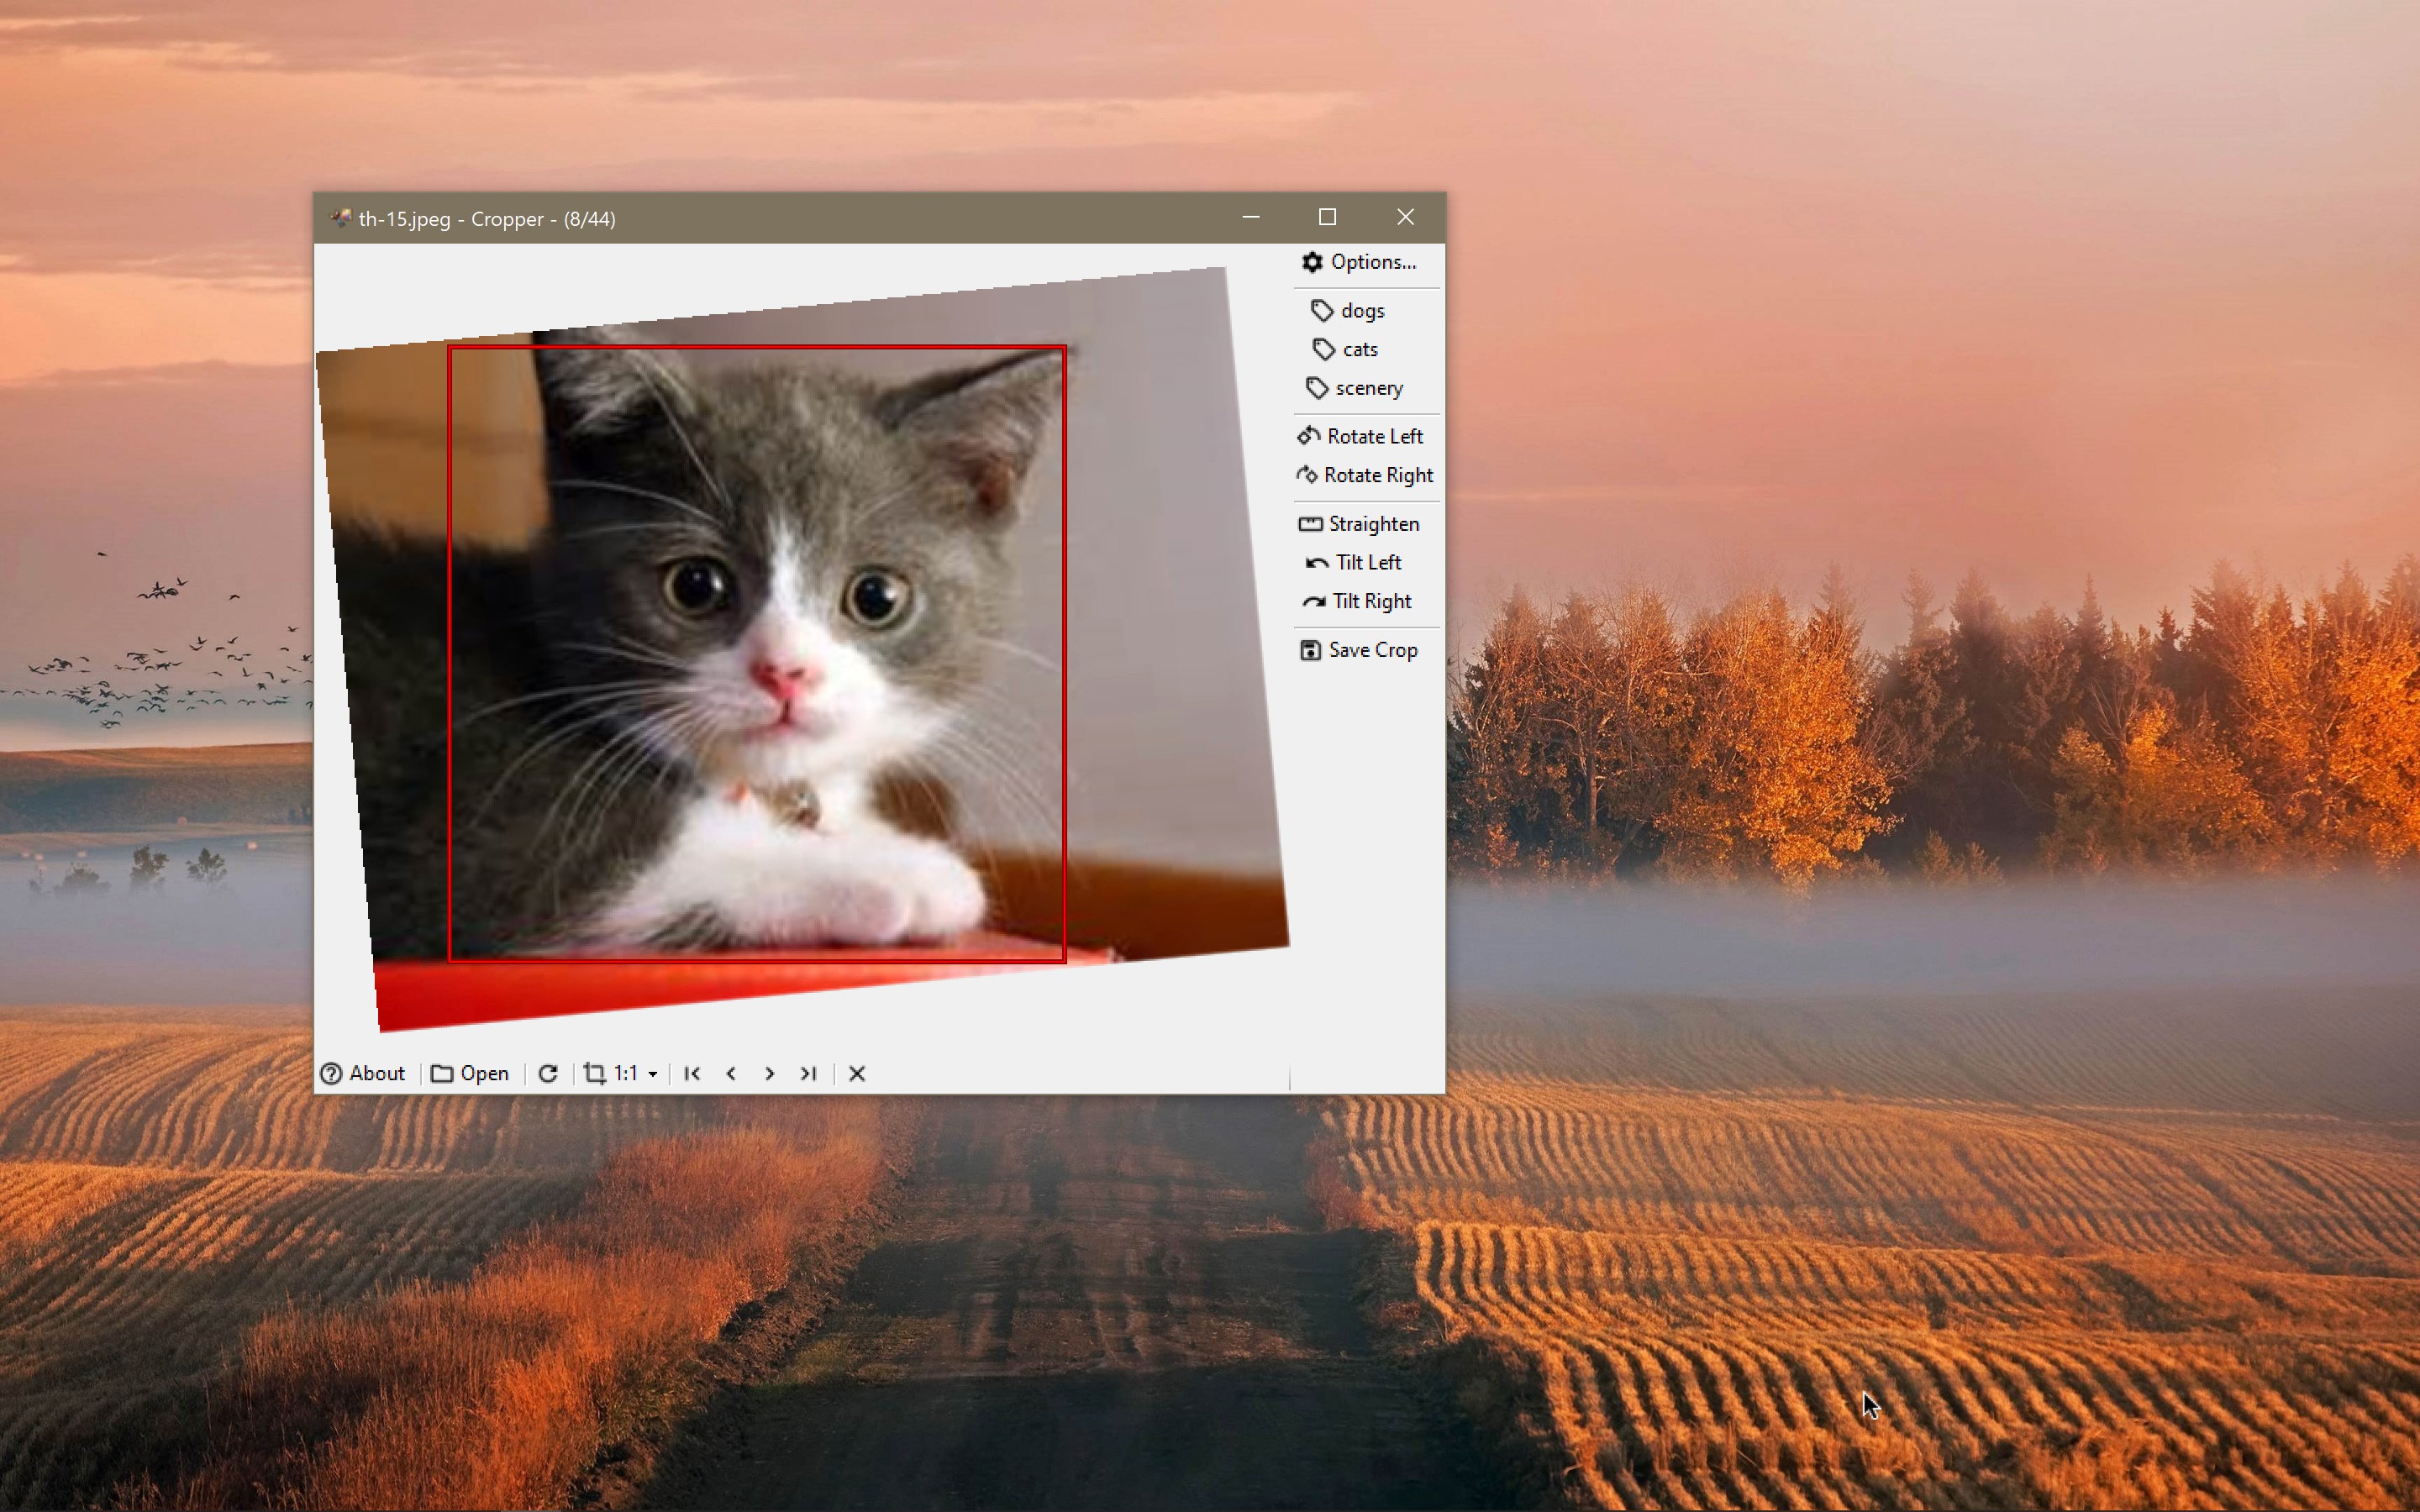
Straightening of images
Click Straighten, then trace along a reference line that should be horizontal or vertical!
Make your scrapbook pages more interesting
Cropper works well to recompose your photos quickly for the scrapbook layout you’re working on. Read more about that here.
How do I use it?
Easy.
- In Windows Explorer, find the image you want to crop
- Run the application from the Start Menu
- Drag the file into the “Drop photo here” area of the window
- Use your mouse or stylus to drag a rectangle in the photo area. Reposition the rectangle if you wish.
- Click the Save icon. You’ll see an hourglass while the program is doing its work. When the rectangle turns green, it’s finished saving.
- Look in the directory you dragged the image from. You should find a file called something like “DSC0363(Flowers)(1x1)1.jpg”
That’s it. Upload the generated file to your favorite printing service or your photo printer, or use them with PictureMedley.
Getting Started
After installing the program, you’ll find it in the Start menu, under All Programs. Once it’s up on the screen you’ll see a big gray box with the text “Drop a photo here to get started.” You can use your mouse to drag an image file into the application window.
Once you have a photo loaded, use your mouse to drag a rectangle around the part of the image you want to focus on in your cropped photo. Use the left mouse button to draw the rectangle from corner to corner, or use the right mouse button to draw the rectangle from the center outward.
More useful capabilities
Lots of shortcuts using keyboard, mouse, pen, touch
- bring images or folders of images into Cropper by dragging from Explorer using mouse, pen, or touch.
- jump between images using the left/right arrow keys, the back/forward auxiliary buttons on your mouse, or using the back/forward pen or touch flicks in Winndows Vista
- jump to the first or last images using the Home or End keys
- Save the selected area to a crop file using the space or enter keys, or by double-clicking within the crop area.
- double-click a tag to save the selected crop area and apply a specific tag to the file
The original images are untouched. Nothing is overwritten.
The program is designed to leave the original image unmodified. (with the exception of rotating the image of course!). Each area you crop from the image goes into a new file and its name is automatically incremented so that you don’t have to worry about coming up with a unique file name.
It works with Windows shortcuts
I’m in the habit of managing or categorizing my images using shortcuts rather than copies of the images. The main benefits of this approach are that I save disk space, and I avoid worrying about whether an image I find in a folder on my system is the original or not (because the image is a shortcut). This software, like most of the apps on Photility, is compatible with this approach, allowing you to drag a shortcut to an image, or the image itself, into the application window to get started.
You can configure the output folder
The Options screen includes a setting to control where the output files are stored. There are a couple tricks you can use with this setting:
- Enter just a name (e.g. the default is “Crops”) and the folder will be created inside the folder you’re currently processing. For example, if you are processing pictures in “C:\Pictures\Lake Trip 2007” then crops will be saved into “C:\Pictures\Lake Trip 2007\Crops”.
- Enter a relative path along with the name to mix the crops together. For example, if you enter “..\Crops” then in the above example the crops will be saved into “C:\Pictures\Crops”.
Use the Delete button to clean out photos you don’t need.
The Delete button removes the current image file (it goes into the Windows Recycle Bin if you should hit it by mistake)
Double-click on Tags
You can quickly apply a tag and save the crop in a single motion by double-clicking the tag.
Crop outside the lines
Check the Options screen for the setting to allow the crop area to expand slightly outside the image. This allows you to squeeze more of an image into the crop as long as you’re willing to live with the “letterbox” look (black or white bars on top/bottom or left/right). Note that this setting is not currently supported when the image is tilted.
Quickly trim and size your photos!
Download now and get started!